

an Assistent not limited to conversion of VDR-recordings to DVD-images
License


push slaves to work
The "eager beaver" is a workstation running system services of VdrAssistant. That may be the workstation, that hosts the database server, but that's no requirement.
The jobprocessor is the service that requires most cpu power. I you plan to recode HD-recordings or create mkv-backups, use the machine with the most powerfull cpu as eager beaver. On today common PCs the recoding of a recording takes more than 12 hours. Recoding time depends on CPU power and selected quality.
The recoding of a DVD compilation does not take that long, but several hours are quite common too.
The services host needs to be a Linux-System!
The Bash-installer has been designed to install and setup database and system services. As the system services may be spread over several workstations, the bash-installer may be executed at each workstation. The tasks to install can be choosen. The bash-installer depends on these linux-packages:
- dialog
- mysql-client (or mysql-server, if the database should be hosted at the eager beaver)
- sudo
- sun-java6-jdk
The user, that initiates the installation must be granted to use sudo by an entry at /etc/sudoers.
The workstation, that hosts the jobprocessor, is required to have these packages installed:
- imagemagick
- mjpegtools
- transcode
- m2vrequantiser
- dvdauthor
- handbrake-cli
- ffmpeg
- vdr
The host of the recordingmanager service requires:
- vdr-genindex
- handbrake-cli
- ffmpeg
- vdr
Debian is what I understand as reliable operating system, so I describe workstation preparation based on Debian.
The required packages of VdrAssistant are not available through the main package repository, so the package system needs to be extended to find those packages:
Load /etc/apt/sources.list in your favorite editor and extend the deb-entries of the Debian-repositories with the section entries "contrib" and "non-free", so the entries might look like:
deb http://ftp.debian.org/debian/ lenny main non-free contrib
deb-src http://ftp.debian.org/debian/ lenny main non-free contrib
To add the Debian multimedia repository, you'll have to download and install the keys first. After that we create a new repository information file and reload the cache (the packages of the non-free section of multimedia are not available as source-packages, so we need only one line) :
wget --quiet http://www.debian-multimedia.org/pool/main/d/debian-multimedia-keyring/debian-multimedia-keyring_2008.10.16_all.deb
dpkg -i debian-multimedia-keyring_2008.10.16_all.deb

echo "deb http://www.debian-multimedia.org lenny main non-free" > /etc/apt/sources.list.d/debian-multimedia.org.list

apt-get update
# load and activate e-tobis keys
wget --quiet http://e-tobi.net/vdr-experimental/pool-lenny/binary/base/e-tobi-keyring_2008.03.08_all.deb
dpkg -i e-tobi-keyring_2008.03.08_all.deb

# setup e-tobis vdr repository
cat > /etc/apt/sources.list.d/vdr.list << EOF
   # release = vdr-experimental | vdr-testing
   # dist    =  etch | lenny | sid
   # section = base | backports | addons | vdr-standard | vdr-extensions |
   # vdr-multipatch

   deb http://e-tobi.net/vdr-experimental lenny base backports addons vdr-multipatch
   deb-src http://e-tobi.net/vdr-experimental lenny base backports addons vdr-multipatch
EOF

# packages from e-tobi are the freshest
cat >> /etc/apt/preferences << EOF
Package: *
Pin: release o=e-tobi.net
Pin-Priority: 1001
EOF

apt-get update
cat > va.packages << EOF
   dialog
   mysql-client
   sudo
   sun-java6-jdk
   imagemagick
   mjpegtools
   transcode
   m2vrequantiser
   dvdauthor
EOF

apt-get install $( < va.packages )
As already mentioned at Requirements, /etc/hosts must be checked
As the bash-installer uses sudo, the user that starts installation needs to be granted to sudo usage. But don't start installation as root!
So we need to edit /etc/sudoers. If you don't know the syntax of sudoers, you'll might duplicate the entry from root and change root with your username. Such an entry (for a supposed user vaUser) might look like:
vaUser ALL=(ALL) ALL
Next we have to check, whether the right java will be used. On Debian systems, /usr/bin/java is a link to /etc/alternatives/java, which itself is a link to the active Java. On a standard installation, /etc/alternatives/java points to the wrong (gcj-)Java. We'll have to change that. Additionally we need to setup the environment var JAVA_HOME. Normally this will be done a user level in a .bashrc or the like. To setup JAVA_HOME that the system services will see that var, we'll need to extend /etc/profile. Both steps require superuser privileges.
First we need to find out, where the sun jdk has been installed. On Debian systems this will (most likely) be at /usr/lib/jvm so that /usr/lib/jvm/java-6-sun is our JAVA_HOME.
sudo ln -sfn /usr/lib/jvm/java-6-sun/jre/bin/java /etc/alternatives/java
sudo echo 'export JAVA_HOME="/usr/lib/jvm/java-6-sun"' >> /etc/profile
sudo vim /etc/profile
The recording scanner needs a directory for scratch-files. This should be a memory area for faster access. Such a ramdisk can be created on linux systems ...
On recent linux systems tmpfs may suffice, so you only have to add an entry to /etc/fstab:
none /ramdisk tmpfs size=64m 0 0
If that fails or is not supported, use the old-fashioned way:
Check, whether the kernel supports a ramdisk:
ls -l /dev/ram*
dmesg | grep -i ramdisk
kernel /boot/vmlinuz-2.6.xxx root=/dev/sdxx ro quiet vga=791 ramdisk_size=64000
If not done already, you'll have to create a directory for the ramdisk:
mkdir /ramdisk
mke2fs -m 0 /dev/ram0
mount -t ext2 /dev/ram0 /ramdisk
chmod og+w /ramdisk
If you don't have any devices like /dev/ram*, we'll need to create some ... We'll use /etc/rc.local again. Of cause, we need to create the device, before we can format it, so we add the lines in front of "mke2fs ...". The whole addition to /etc/rc.local looks like:
mknod -m 660 /dev/ram0 b 1 1
chown root:disk /dev/ram0
mke2fs -m 0 /dev/ram0
mount -t ext2 /dev/ram0 /ramdisk
chmod og+w /ramdisk
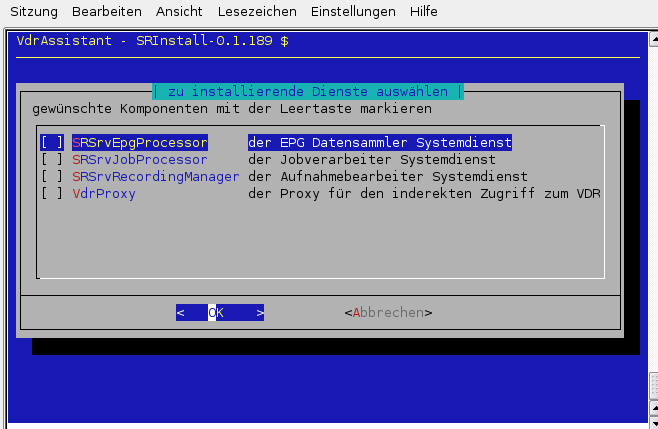
The installer contains language texts for english and german. The language can be choosen at the beginning of installation. After that, the installation task have to be selected. The dependencies vary depending on your selection. To setup the database, the bash-installer should be executed on the workstation hosting the database server.
The workflow of the installer is to first ask, whether to create or update a database. Than the services can be selected for installation. If you wonna setup a database only, leave the services unchecked an run the installation. That should create your database.
After database setup, the services will be installed and setup.
The bash-installer logs its actions to a logfile, which will be displayed after installation. So installation success can be verified.